 Good afternoon,
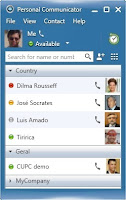
In my newpost, I want to talk about how to add user avatars (profile photos) for CUPC or Jabber centrally. Using these communicators becomes much more interesting and more convenient if we visually see a photo of our contact. But not everyone knows how to make avatars to be displayed on your device. This is what we will talk about in the next few minutes.
In fact, everything is very simple. For centralized profile photo management a web-server is required. In our example I am using Windows 2003 Server with IIS (Internet Information Services) enabled. In the folder for web access (C: \ Inetpub \ wwwroot) let's create a new folder with name photos. We will place here the avatars of users as jpg-files. Profile photo files should have the same name as the user account in Active Directory. For example, suppose that my account in AD is dbenda. Then, the image file, referred to as my avatar, must be named as dbenda.jpg.
Then adjust the Cisco Unified Presense. Link to avatars is created in the Application -> Cisco Unified Personal Communicator -> Settings:
Find CUPC LDAP Attribute Mapping settings and change the Photo parameter, which indicates a link to our avatars.Profile photo file name is specified in the following format:
%% SAMAccountName %%. Jpg
(that's why the names of avatars match account names in AD).
In our example, the link is as follows (IP address of our web-server is 10.1.1.9):
http://10.1.1.9/photos/%%sAMAccountName%%.jpg


Добрый день.
ReplyDeleteНе ясно какой размер должен быть у аватарки?
Добрый день,
ReplyDeleteНе нашел нигде инфу размерах самой аватарки, пробовал на разных jpg-файлах. Все они "подхватывались" без проблем.
Если проблема не в размерах, то помогите пожалуйста разобраться с аватарками. У меня стоит CUP IM 9.1.1.31900-1 + CUCM 9.1 + LDAP(MS AD) + Cisco Jabber 9.2.3
ReplyDeleteДля фотографий использую внешний web сервер. В CUP-е настраиваю адрес Web-сервера(http://10.1.1.9/photos/%%sAMAccountName%%.jpg) в поле Photo таблицы Legacy Client LDAP Attribute Mapping (Application -> Legacy Client -> Settings).
Но в Jabber все равно не появляются аватарки.
Как продебажить где ошибка? Или в CUP 9.1.1 по другому настраивается?
К сожалению, на 9.1.1 мне не доводилось настраивать аватарки. :( Поэтому, сказать, настраивается ли 9.1.1 так же, как 8.0, не смогу.
DeleteВсе дебаги для CUCM/CUP обычно делаются в RTMT.
Спрошу банальность: Вы в настройках CUP указали-то айпишник своего веб-сервера? Не моего случайно? Мой сервер 10.1.1.9.
Удалось настроить автарку в джабере новом?
DeleteТак и не попробовал еще, к сожалению, времени катастрофически не хватает. :(
DeleteДобрый вечер Дмитрий! не знаю где написать свой вопрос, но так как он связан с CUPS напишу его здесь. Установил кластер CUCM11.5. Теперь стоит задача развернуть кластер из серверов IM&Presence11.5. Прочитал installation guide, пересмотрел ряд видео, но вопросы остались. нужно ли при первичной установке IM&Presence Publisher добавлять эту ноду на Publisher CUCM в разделе System-Server (IM&Presence Server node). судя по гайдам сюда добавляются только ноды Subscriber. или же в новых версиях уже нет такого понятия как Publisher для IM&Presence и все завязано на Publisher CUCM. буду рад если поясните ситуацию.
ReplyDeleteДоброе утро, Андрей. Действительно, в новых релизах нет понятия Publisher для CUP. При инсталляции сервера CUP добавляются как Subscriber’ы в кластер CUCM. Такова новая идеология.
DeleteИтак, что нужно сделать:
1) В веб-интерфейсе Publisher CUCM добавить айпишник устанавливаемого CUP
2) Создать виртуалку CUP на основе шаблона ova
3) Установить CUP
Дмитрий спасибо за ответ. Есть еще один вопрос.При настройке интеграции Cucm и cup со стороны коллменеджера настраивает транк в сторону cup. А как быть в случае кластера cup. Насколько помню в параметрах транка можно только один адрес вводить. Или нужно указать использование srv записи? Если это так, то как она должна быть настроена на днс сервере?
DeleteЗаранее спасибо.
Здравствуйте, Андрей. В случае кластера CUP Вы должны указать в транке несколько айпишников серверов CUP или FQDN. Использовать SRV записи не получится в этом случае. Вот фрагмент доки цыско:
DeleteIf high availability is configured for the IM and Presence cluster, multiple entries should be entered in the Dotted IP Address or FQDN to identify the various nodes in the cluster. DNS SRV cannot be used for an IM and Presence cluster if high availability is configured.
Добавить следующий адрес Вы сможете, если нажмете + справа от первого указанного адреса.